Welcome back! I cannot wait to upload and share photos of my room. I have a few different things in my room this year (because the first year is all about learning what works and what doesn't!). I'm excited to share my new ideas with y'all!
But right now I'm going to share my "DONATIONS APPRECIATED" list with you guys. If you have any of these things laying around, I'd love to take them off your hands. :)
1. Individual boxes of 24 count Crayola colored pencils
2. Individual boxes of 24 count Crayols crayons
3. Black fine tip Sharpie markers (I need LOTS!)
4. Masking Tape
5. TRU-RAY construction paper (any color, black) found here!
6. Colorox wipes, cleaning supplies, old rags, sponges, etc.
7. Paper towels and ziplock bags
8. Magazines and newspapers
9. Old t-shirts
10. Individual pencil sharpeners
11. Copy paper
If you have some items that you think I'd like them please email me: rachel.stricklin@decaturschools.org
I order all drawing paper/ watercolor paper/ etc. from Dick Blick.
Thank you all so much for any help you can provide!
Ms. Rachel
Ms. Art Teacher
Friday, August 2, 2013
Wednesday, May 15, 2013
Dali's Moustache
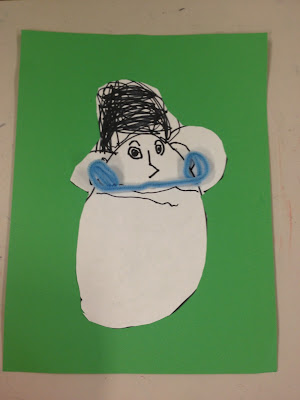
With it being THIS close to the end of the school year, I wanted to give my students a last project that was fun! I had read on a few blogs where they had did a lesson based on Salvador Dali's moustache and I thought that would be perfect. We viewed a PPT I created on Salvador Dali. I explained what Surrealism was and showed the Persistence of Memory by Dali. I was pleasantly surprised at how many actually had seen the painting before. I then told them that we would not be doing a project based on Surrealism, but we would do a project based on Dali's moustache. They got a big kick out of that! I showed them multiple photos of Dali's crazy moustache and we looked at different facial expressions. We then took a Sharpie marker and drew a face and hair, cut it out, and glued it on to a piece of construction paper. I let them pick a pipe cleaner color of choice for their moustache. I used hot glue and glued them on. They styled the moustache how they wanted. Such a fun and laid back for the end of the year!
Tuesday, May 7, 2013
Simon Says... Art Edition!
Cityscapes and Perspective
Wow, oh, WOW! I enjoyed this project SO much! And I think the kids did, too. They turned out so great. I saw this idea on Pinterest and thought I'd give it a try! I did a cityscape lesson last year, but this seemed like it would be a little easier for my 3rd and 4th graders. I showed a PPT of several different cityscapes from NYC, to Venice, to Singapore. They loved how Venice was filled with waterways! We started out by making a big X from corner to corner. The we put in the vanishing point right in the middle of the X. We then drew the horizon line through the vanishing point side to side. I told them we were making building on the right and trees on the left. I showed them step-by-step how to do the buildings, and how to use the X lines to make sure everything is lined up really well. After everything was drawn, then we traced over ALL lines with a black Sharpie marker and colored everything. Here are a few of the ones who got finished on the day I snapped photos!
I chose to make my Artist of the Month for the last month of school the students at PES! :)
Fantastic Cityscapes 4th Grade!
Love how artistic this girl is! And I love her Cherry Blossoms! :)
At night during a thunderstorm! Great!
A giant lady bug is taking over this city! Ha!
Love the shark airplane!
Love the sunset :)
These all turned out so great! The most difficult thing for the students was to draw the lines in the sidewalk horizontal! They could tell you all day what horizontal means, but they just couldn't understand how to make the sidewalk lines! Too funny.
Thursday, April 25, 2013
A Day in the Life... of an Art Teacher
- Somewhere between 5:00 and 5:30 I wake up and get ready for school
- 6:30 - Oliver wakes up and watches Disney, gets dressed, and drinks chocolate milk and has breakfast (usually toast and honey)
- 7:00 - I eat breakfast and pack lunch
- 7:20 - Leave the house and head to school
- 7:30 - Bell rings and I monitor the halls until 7:45
- 7:45 - Planning starts. I'm usually getting supplies ready for classes depending on the project. If we are painting or doing collage I make sure to prepare supplies at the end of the previous day.
- 8:30 - Reading group with 4-6 first graders until 9:30
- 9:30-10:15 Kindergarten (currently working on Picasso portraits)
- 10:15-11:00 4th Grade (currently working on perspective and cityscapes)
- 11:00-11:15 small break between classes usually spend preparing supplies for next class/restroom break/ mailbox check/ email check/ sometimes eating lunch fast!
- 11:15-12:00 3rd Grade (currently working on perspective and cityscapes)
- 12:00-12:30 Lunch!
- 12:30-1:15 1st Grade (Picasso portraits currently)
- 1:15 - 1:30 small break preparing for the next class/ restroom/ etc
- 1:30-2:15 2nd Grade (Picasso portraits currently)
- 2:15-2:30 Cleanup/ preparation for classes the next day
- 2:30-3:00 Hall duty while the kids leave school
- 3:00 Head home /run errands/ go to the park/ grocery store/ homework/ cook dinner or eat out/ laundry/ dishes/ plan lessons/ do Oliver's homework/ batting lessons/ checking social media/ uploading Instagram photos/ etc.
- TBall has started so 2 nights a week is spent at the ballpark
- 8:00 Oliver's bedtime unless we are still playing ball
- 9:30 My bedtime!
We art teachers like to stay busy :)
Follow my Instagram and Instacanvas... hey_its_rachel
Tuesday, April 23, 2013
Picasso Faces
One of my favorite portrait lessons to do with my K-2 students is a Picasso Portrait lesson. They think it's fun to make silly faces! I love the reaction I get when I show my PPT of different Picasso portraits. It's mostly, "Ewww!," "Ahhhh!," "That's weird!," etc. It's always a fun lesson! We discuss how Picasso usually combined two different views of a person and that's why the faces look like they do. I do a step-by-step guide with them while drawing the face and the features. We discuss different way to draw eyes, noses, mouths, eyebrows, hair, etc. We outlined our pencils lines with a black crayon and then I let them color it as wild as they wanted! We then practiced our cutting and gluing skills, focusing really hard on cutting around the head perfectly and then gluing the edges very well. Here are a few examples of one of my kindergarten classes work...
Thursday, April 11, 2013
Falling for Foreshortening
As much as I wish I could, I cannot take credit for this lesson. I do apologize because I'm not sure who is to credit because I have seen it on so many Pinterest boards and blogs. I knew when I found this lesson back in August that I HAD to try it with my kids. And they LOVED it! It turned out so, so good! We discussed foreshortening and I gave them examples and had them give me examples. Then we traced both shoes and hands and drew in their self portrait behind the shoes and fingers. I just love how these turned out! I gave them the option to trace their lines using a sharpie or just a pencil, and they could also color all or parts of their self portrait. This lesson was done by my 2nd, 3rd, and 4th grades.
I purchased a couple of new books from Amazon to add to my book collection in my classroom!
Subscribe to:
Comments (Atom)


